Showing posts with label powershell. Show all posts

Wednesday, 4 May 2016

Deploying Azure websites and webjobs using your CI system with msbuild and azure powershell cmdlets

There are lots of tutorials detailing how to send web apps and web jobs up to azure as part of your CI pipeline but I've found them all lacking, mainly in that they require you to upload to Azure in the same command as performing your build.
Often this command looks like the following:
msbuild.exe foobar.csproj /p:DeployOnBuild=true /p:PublishProfile="azurePubProfile" /p:Configuration=Release
This simultaneously builds, configures and publishes the project to azure.
 
This is unacceptable to me as I want to promote the same built artifact through many environments ci-test-preprod-prod where the only thing to change is the config getting deployed to each. I don't want to keep building the code over and over when I deploy which has many issues ranging from changes in the code between deployments to changes in the environment of the build machine. I want to know that what is getting deployed to prod is exactly the same binaries as was deployed and tested in all previous environments. To achieve this we need to separate the building of the artifact from the deployment.

What follows is the method we are now using to build and deploy our services to Azure. It breaks down into 4 simple steps
  1. Build your solution, firstly restoring any nuget packages if needed
  2. Configure your service for the target environment and zip up the artifact
  3. Configure the powershell session for azure
  4. Publish the zipped artifact to azure

App service (websites)

Build

Firstly build your solution, if using any nuget packages restore these first
nuget restore
Perform the build on the solution
msbuild foobar.sln /t:build /p:configuration=release /p:OutDir=BUILD_OUTPUT_PATH
Grab the published website from ./foobar/BUILD_OUTPUT_PATH/_PublishedWebsites/foobar and safe it to your artifact store of choice.

Deploy

Firstly apply the correct config for your target environment for this deployment to the artifact saved from the build. there are many ways to do this so i wont go in to it here.

Next zip up the deployable artifact
Add-Type -Assembly System.IO.Compression.FileSystem
$compressionLevel = [System.IO.Compression.CompressionLevel]::Optimal
[System.IO.Compression.ZipFile]::CreateFromDirectory($sourcedir, $zipfilename, $compressionLevel, $false)

Prepare the powershell session for the upload to azure
Load in your azure cert
Import-AzurePublishSettingsFile azure-credentials.publishsettings
Select the desired subscription
Select-AzureSubscription 00000000-0000-0000-0000-000000000001
Publish the website using the azure cmdlet
Publish-AzureWebsiteProject -Package buildoutput.zip -Name foobar -Slot 'staging'

Webjobs

As above except the location of the built artifact foobarjob/BUILD_OUTPUT_PATH
And the cmdlet for creating the webjob
New-AzureWebsiteJob -Name foobar -JobName foobarjob -JobType Continuous -JobFile .\buildoutput.zip

Conclusion

It turns out its actually really easy to achieve the result we desired, mainly the repeatable deployment of a known, tested build artifact to any environment we like.

We use GoCd from thoughtworks to orchestrate the above process through the pipelines feature. When all this is combined with staging slots, blue green deployments and the like you get a really robust process, excellent auditability, a solid rollback strategy and not to mention peace of mind when pushing to prod.

Id love to hear how you achieve the same results, whether its through version control strategies, azure deployment slot strategies or something else.
Let me know.

Thursday, 7 April 2016

Applying Azure resource locks to all the databases and storage accounts in a given resource group with powershell

If you have followed any of my previous blogs you will know we have tens of microservices (over 50) in our current architecture. With these microservices goes data (lots of data, valuable data). Each service has storage accounts and/or databases (which we dont really want to loose). We have been going through the process of automating the creation of these resources and in the process need to ensure they are not accidentally deleted (as we have tear down scripts, dangerous in the wrong hands).

Powershell

What follows are some powershell commands that can add resource locks to all your databases and storage accounts, they took a while to build, but are very effective, enjoy.
Write-Host -ForegroundColor Cyan "Adding a CanNotDelete lock to all databases"
Get-AzureRmResource `
 | Where-Object {$_.ResourceGroupName -eq myresourcegroupname -and `
                 $_.ResourceType -eq "Microsoft.Sql/servers/databases"} `
 | Select-Object `
     ResourceName,ResourceType, `
     @{name="name"; `
       Expression={$_.name.replace("myazuresqlservername/","")}}, `
     @{name="lockname"; `
       Expression={"lock-databases-"+$_.name.replace("myazuresqlservername/","")}} `
 | %{New-AzureRmResourceLock -ResourceGroupName myresourcegroupname`
                             -LockLevel CanNotDelete `
                             -LockNotes "Prevent accidental deletion" `
                             -LockName $_.lockname `
                             -ResourceName $_.ResourceName `
                             -ResourceType $_.ResourceType `
                             -Verbose -Force -ErrorAction Stop}

Write-Host -ForegroundColor Cyan "Adding a CanNotDelete lock to all storage accounts"
Get-AzureRmResource `
 | Where-Object {$_.ResourceGroupName -eq myresourcegroupname -and `
                 $_.ResourceType -eq "Microsoft.Storage/storageAccounts"} `
 | Select-Object ResourceName,ResourceType,Name, `
                 @{name="lockname"; `
                   Expression={"lock-storageAccounts-"+$_.name}} `
 | %{New-AzureRmResourceLock -ResourceGroupName myresourcegroupname`
                             -LockLevel CanNotDelete `
                             -LockNotes "Prevent accidental deletion" `
                             -LockName $_.lockname `
                             -ResourceName $_.ResourceName `
                             -ResourceType $_.ResourceType `
                             -Verbose -Force -ErrorAction Stop}

You can customise a bit further and replace the strings "myazuresqlservername" and "myresourcegroupname" with powershell variables and stick this straight in a powershell console or in a script.

Lock removal

As an aside, if you do subsequently want to delete the DB or storage account you first need to remove the lock like this:
Remove-AzureRmResourceLock -ResourceId /subscriptions/00000000-1111-2222-3333-444444444444/resourceGroups/myresourcegroupname/providers/Microsoft.Sql/servers/myazuresqlservername/databases/mydatabasename -LockName lock-databases-mydatabasename

Feedback

Please if you found this useful or you know a better way let me know in the comments below. cheers.

Tuesday, 29 March 2016

The fallout of going the microservice route. Build and deploy headaches

Build/Deploy issues with GoCd

As you may have seen in a previous blog post we have a lot of pipelines, over 500 now and its set to grow by another 200 in the next month as we bring another 3 environments up. 700 pipelines is too much for a vanilla go instance to handle, the server can sometimes wait 3-4 minutes before detecting a check-in or to respond to a manual pipeline click.
I'm not having a go at go (no pun intended) i love it i think its very good at its job, but when you get to this scale apparently the embedded H2 DB starts to be a bottleneck and so you need to upgrade to the postgreSQL plugin which adds more power on the back end which would solve some issues I've seen. But there is also an issue with the main pipelines UI which can take 10+ seconds to render with 500 pipelines on the page at once, I put this down to browser performance as you can see the call to the server coming back quite quick with the markup, its just a very big page (15000+ divs, 1600+ forms, 4300+ input fields all with associated styling and javascript). So with all this in mind we decided to split up our go server into six smaller instances.

Go server/agent setup

We have over 70 micro-services mainly written in .net but with a scattering of node and spa apps (detailed here), each is independently deployable and so we have decided to split them based on service boundary which we have roughly 6. So we have decided to create 6 go servers and split the workload across all six so that each server will only be handling 1-2 hundred pipelines each.

There are three consequences to splitting up the servers like this: One is that any templates are going to get duplicated, and you will have to keep track of failing builds on six servers instead of just one which means you will need to log into six servers and remember which services are on which go server instance. But by splitting the work by service boundary we will keep the value stream map intact where by we would loose it if we had split the servers by deployment region of which we now have three (each with a test, preprod and prod environment).

Installing multiple go agents on one VM, pointing at multiple different go servers

So we have six VMs each with a go server installed, and now by the use of powershell six agents on each VM. Each VM has an agent for each of the servers so that the workload can be spread evenly. The problem with this is that whilst a given VM can host several agents (read this) all the agents will point back to the same go server because the install uses an environment variable. The solution to this is to hack the config\wrapper-agent.conf file, change all the instances of '%GO_SERVER%' replacing it with 'go-serviceboundary1.mydomain.com' which is the DNS entry for the go server you are working for.

Given i was creating six agents on six machines i didn't want to do this by hand so i created a script to do it for me (found here) the more interesting bits are summarised below:

Download the latest go agent:
$goSetupExe = "go-agent-16.2.1-3027-setup.exe"
$client = new-object System.Net.WebClient
$client.DownloadFile("https://download.go.cd/binaries/16.2.1-3027/win/$goSetupExe", "C:\go\$goSetupExe")

Command line install the first agent
.\go-agent-setup.exe /S /SERVERIP=go-serviceboundary1.mydomain.com /D=C:\go\agent1
Copy the install to a new instance
new-item "C:\go\agent$agentNumber" -ItemType Directory
Copy-Item "C:\go\agent1\*" -Destination "C:\go\agent$agentNumber" -Recurse
Remove-Item "C:\go\agent$agentNumber\config\guid.txt"
Remove-Item "C:\go\agent$agentNumber\*.log"

Rewrite the config
(Get-Content "C:\go\agent$agentNumber\config\wrapper-agent.conf").replace('go-serviceboundary1.mydomain.com', "go-$boundedContext.mydomain.com") | Set-Content "C:\go\agent$agentNumber\config\wrapper-agent.conf"

(Get-Content "C:\go\agent$agentNumber\config\wrapper-agent.conf").replace('c:\go\agent1', "c:\go\agent$agentNumber") | Set-Content "C:\go\agent$agentNumber\config\wrapper-agent.conf"

Create and start the second service instance
New-Service -Name "Go Agent$agentNumber" -DisplayName "Go Agent$agentNumber (go-$boundedContext.mydomain.com)" -Description "Go Agent$agentNumber (go-$boundedContext.mydomain.com)" -StartupType Automatic -BinaryPathName "`"C:\go\agent$agentNumber\cruisewrapper.exe`" -s `"c:\go\agent$agentNumber\config\wrapper-agent.conf`""

Start-Service "Go Agent2"


It works really well for getting a new setup running quickly, and if i ever need to add a new go server and new agents this will be easy to extend to quickly get up and running.

Feedback

It would be great if i could get some feedback as to whether this is a good idea or not, or else how best to split things up, but i feel this is a nice pragmatic solution with minimal downsides.

Tuesday, 17 November 2015

Splunk alerts to slack using powershell on windows

We use Splunk to aggregate all the logs across all our services and APIs on many different machines. It gives us an invaluable way to report on the interactions of our customers through new business creation on the back-end servers running on NServiceBus, to the day to day client interactions on the websites and mobile apps.

We have been investing in more monitoring recently as the number of services (I hesitate to use the buzzword micro, but yes they are small) is increasing. At present pace I'd say there is a new service or API created almost each week. Keeping on top of all these services and ensuring smooth running is turning into a challenge, which splunk is helping us to meet. When you add service control, pulse and insight from particular (makers of NServiceBus) we have all bases covered.

We have recently added alerts to splunk to give us notifications in slack when we get errors.

The Setup

We are sending alerts from splunk to slack using batch scripts and powershell.

Splunk Alerts

First set up an alert in splunk, This splunk video tells you how to create an alert from a search results. We are using a custom script which uses arguments as documented here. Our script consists of 2 steps a bat file and a powershell file. The batch file calls the powershell passing on the arguments.

SplunkSlackAlert.bat script in C:\Program Files\Splunk\bin\scripts
@echo off
powershell "C:\Program` Files\Splunk\bin\scripts\SplunkSlackAlert.ps1 -ScriptName '%SPLUNK_ARG_0%' -NEvents '%SPLUNK_ARG_1%' -TriggerReason '%SPLUNK_ARG_5%' -BrowserUrl '%SPLUNK_ARG_6%' -ReportName '%SPLUNK_ARG_4%'"

SplunkSlackAlert.ps1 lives alongside
param (
   [string]$ScriptName = "No script specified",
   [string]$NEvents = 0,
   [string]$TriggerReason = "No reason specified",
   [string]$BrowserUrl = "https://localhost:8000/",
   [string]$ReportName = "No name of report specified"
)

$body = @{
   text = "Test for a parameterized script `"$ScriptName`" `r`n This script retuned $NEvents and was triggered because $TriggerReason `r`n The Url to Splunk is $BrowserUrl `r`n The Report Name is $ReportName"
}

#Invoke-RestMethod -Uri https://hooks.slack.com/services/AAAAAAAAA/BBBBBBBBB/CCCCCCCCC -Method Post -Body (ConvertTo-Json $body)

Slack Integration

You can see the call to the slack API in the invoke-restmethod, the slack documentation for using the incoming web hook is here. there is quite a rich amount of customization that can be performed in the json payload, have a play.

Before you can actually use this you must first setup slack integration as documented here which requires you to have a slack account.

The fruits of our labor:


All the script code is given in my gist here.

Credits:

Thanks to my pair Ruben for helping on this, good work.

Wednesday, 15 October 2014

Blue green web deployment with powershell and IIS

I wanted to follow up my earlier post (about our current CD process) with a more technically focussed one, one that can describe the nuts and bolts of the actual BlueGreenDeployment.

Technology 

Powershell, powershell and powershell, oh and windows, IIS and Go (build server)

Process

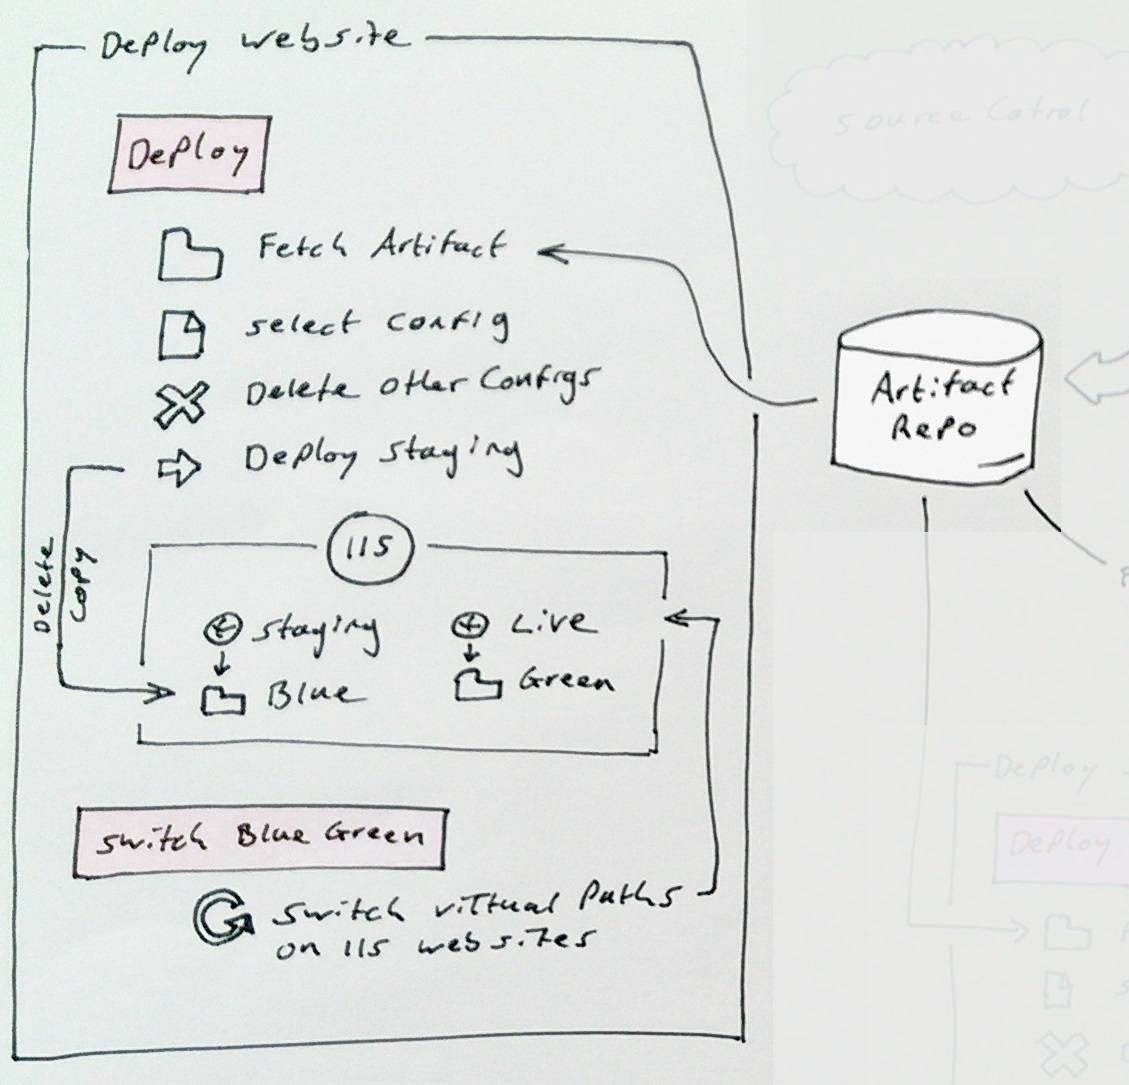
As I described in my earlier post the blue green web deploy consists of these steps:


1. Deploy
1.1 Fetch artifact
1.2 Select the config for this deployment
1.3 Delete the other configs
1.4 Deploy to staging (delete then copy)
1.5 Backup live

2. Switch blue green
2.2 Point live to new code
2.3 Point staging to old code

Blue Green Deployment

Before diving in to the details I should firstly convey what blue green deployments are, and what they are not.
There are a few different ways to implement blue green deployments but they all have the same goals:
1. Allow testing on live without actually being live.
2. Enable deployments to have the smallest possible impact on the live service as possible.
3. Give you an easy roll-back path.

This can be accomplished in many ways. Techniques include DNS switching, directory moving, or virtual path redirecting. 
We have chosen to do IIS physical path redirecting. This allows us to do the same technique on all our environments from test to live, same scripts, same code, and doesn't cost as much as requiring multiple servers which DNS switching would require.

Commands used for this demo are

PS> .\Create-Websites.ps1 -topLevelDomain co.uk
PS> Deploy-Staging -source c:\tmp -websiteName foobarapi -domainName foobar.co.uk
PS> Backup-Live -WebsiteName foobarapi -DomainName foobar.co.uk
PS> Switch-BlueGreen -WebsiteName foobarapi -DomainName foobar.co.uk

The code I'm going to talk through is all located here: https://github.com/DamianStanger/Powershell

Conventions used:

All websites are named name.domain and name-staging.domain
All backing folders are in c:\virtual and are named name.domain.green and name.domain.blue
You don't know if blue or green is currently serving live traffic.
Backups are taken to c:\virtual-backups\name.domain
Log files always live in c:\logs\name.domain
There is always a version.txt and bluegreen.txt in the root of every website/api

In this example I'm using name=foobarapi and domain=foobar.co.uk

The technical detail

This is the meaty stuff, it consists mainly of powershell, and should work no matter what CI software you are using. I can heartily recommend Go by Thoughtworks. It has a built in artifact repository and brilliant dependency tracking through its value stream map functionality.

Setup IIS and backing folders

To test my deployment scripts you will firstly need to set up the dummy/test folders and IIS websites. For this you can use this script: Create-Websites.ps1. I'm not going to go into detail of the script as its not the focus of this post but it creates your app pool and website.

The code is exercised with the following:
setupWebsite "foobarui" "foobarui-test" $true "green"
applyCert("*.foobar.*") <<optional if you want the sites to have an ssl cert applying>>

This will create 2 websites on IIS pointing to the green and blue folders as per the conventions outlined further above. Finally apply an SSL certification using powershell, this command will apply the SSL cert to all the websites in this instance of IIS.
To remove the created items from IIS issue commands similar to this:
PS> dir IIS:\AppPools | where-object{$_.Name -like "*.foobar.co*"} | Remove-Item
PS> dir IIS:\Sites | where-object{$_.Name -like "*.foobar.co*"} | remove-item
PS> dir IIS:\SslBindings | remove-item

Once you have the websites correctly set up you can then utilise the deploy blue green scripts :-)

Deployment

The Blue Green deployment module is located here: BlueGreenDeployment.psm1 and will need importing into your powershell session with the following command:
PS> Import-module BlueGreenDeployment.psm1
Once you have the module imported you can issue the following commands:
PS> Deploy-Staging -source c:\tmp -websiteName foobarapi -domainName foobar.co.uk
PS> Backup-Live -WebsiteName foobarapi -DomainName foobar.co.uk
PS> Switch-BlueGreen -WebsiteName foobarapi -DomainName foobar.co.uk

Lets dig into these one by one.

1. Deploy-Staging
This is quite straight forward. Find the folder that is currently serving staging and copy the new version there. The interesting bit of code is the method of determining which folder to replace with the new version. IsLiveOnBlue and GetPhysicalPath work together to determine the folder in use on staging. Notice the retries inside GetPhysicalPath I found that sometimes IIS just doesn't want to play, but if you ask it a second time it will?? Don't ask..
The code that actually determines the physical path is:
$website = "IIS:\Sites\$WebsiteName.$domainName"
...
$websiteProperties = Get-ItemProperty $website
$physicalPath = $websiteProperties.PhysicalPath

The rest of the powershell is relatively straight forward

2. Backup-Live
Backing up live is again pretty standard powershell. Again determine the folder that is serving live then do a copy. Done.

3. Switch-BlueGreen
Performing the switch is actually really easy when it comes to it. Firstly determine which folder (blue or green) is serving live (same code as the deploy step) and then switch it with the staging website.
Set-ItemProperty $liveSite -Name physicalPath -Value $greenWebsitePath -ErrorAction Stop
The only added complication is the rewriting of the log file location in the web.config. Log4net only really works well if one process (web site) uses one log file. Again you can look this up yourselves as this is an aside to the main purpose of this post.

Conclusion

The interwebs in general are full of articles/opinions/tales of how bad windows is to automate, it actually winds me up. Maybe it used to be true but I've been finding that with powershell and Go I've been able to automate anything I need. It's so powerful. Don't let the microsoft haters stop you from doing what needs to be done.

The blue green deployment technique outlined here is working really well for us at the moment and has helped us to take our projects live sooner/quicker and with more confidence.

Automation for the win.

Sunday, 12 October 2014

Adventures in continuous delivery, our build/deployment pipeline

Overview

We have been undergoing a bit of a dev-ops revolution at work. We have been on a mission to automate everything, well as much is as possible. Exciting times but we are still only just setting out on this adventure, I wanted to document where we are currently at.

First a brief overview of what we have. We have many many small windows services, websites and apis each belonging to a service and performing a specific role. I must quickly add we are a microsoft shop. More and more are our services moving towards a proper service orientated architecture. I hesitate to use the term micro services as it's so hard to pin a definition on the term but let's just say they are quite small, focused on a single responsibility.

We have 5 or 6 SPA apps mainly written with durandal and angular. 7 or 8 different APIs serving data to these apps and to external parties. 10 to 15 windows services which mostly publish and subscribe to N service bus queues.

We currently have 8 environments that we need to deploy to (going to be difficult to do this by hand, me thinks) including CI, QA*, Test*, Pre-prod* and live* (* the last 4 are doubled as we deploy into 2 different regions which both operate slightly differently and have different config and testing). This list is growing with every month that passes. We really really needed some automation, when it was just 3 environments in the UK region we just about got by with manual deployments.

I'm going to outline how the build pipeline integrates with the deployment pipelines and the steps that we take in each stage. But I'm not really going to concentrate on the actual technical details, this is more of a process document. 

1.0 The build pipeline

We operate on a trunk based development model (most of the time) and every time you check in we run a build that will produce a build artifact, push that in to an artifact repository and then run unit and integration tests on the artifact. 

Fig 1. The build pipeline

Build

1. Run a transform on the assembly info so that the resultant dll has build information inside the details. This aids us determine what version of a service is running on any environment, just look at the dlls properties.
2. Create a version.txt file that lives in the root of the service. This is easily looked at on an API or website as well as in the folder containing a service.
3. We check in all the versions of the config files for all the environments that we will be deploying to and use a transform to replace the specific parts of a common config file with environment specific details (e.g connection strings). Every environment's config is now part of the built artifact.
4. Build the solution, usually with msbuild, or for the SPA apps, gulp
5. If all this is successful upload the built artifact to the artifact repo (the go server)

Test

6. Fetch the built artifact
7. Run unit tests
8. Run integration tests

The test stage is separate so that we can run tests on a different machine if necessary. It also allows us to parallelise the tests running them on many machines at once if required.

Not shown on this diagram are the acceptance tests, these are run in another pipeline. Firstly we need to do a web deploy (as below) then setup some data in different databases and finally run the tests.

2.0 The web deploy pipeline

So far so good, everything is automated on the success of the previous stage. We then have the deployment pipelines of which only the one to CI is fully automated so that acceptance tests can be run on the fully deployed code. All the other environments are push button deploys using Go.
The deployment of all our websites/APIs/SPAs are very similar to each other and the same across all the environments so we have confidence that it will work when finally run against live.

Fig 2. The web deploy pipeline

Deploy

1. Fetch the build artifact
2. Select the desired config for this environment and discard the rest so there is no confusion later
3. Deploy to staging (I've written a separate article on this detailing how it works with IIS powershell and windows)
a. Delete the contents of the staging websites physical path
b. Copy the new code and config into the staging path

Switch blue green

We are using the BueGreenDeployment model for our deployments. Basically you deploy to a staging environment then when you are happy with any manual testing you switch it over to live with the use of powershell to switch the physical folders in IIS of staging and live. This gives a quick and easy rollback (just switch again) and minimises any down time for the website in question.

3.0 The service deployment pipeline

Much the same as the deployment of websites except for the fact the there is no blue green. The Services mainly read from queues and so this makes it difficult to run a staging version at the same time as a live version (not impossible but a bit advanced for us at the moment)

Fig 3. The service deploy pipeline

Deploy

The install step again utilises powershell heavily, firstly to stop the services, then back things up and deploy the new code before starting the service up again.

There is no blue green style of rollback here as there are complications to doing this with windows services and with reading off the production queues. There is probably room for improvement here but we should be confident that things work by the time we deploy live as we have proved it out in 2 or 3 environments before live.

Summary

I'm really impressed with Go as our CI/CD platform it gives some great tooling around the value stream map, promotion of builds to the other environments, pipeline templates and flexibility. We haven't just arrived at this setup of course, its been an evolution which we are still undergoing. But we are in a great position moving forward as we need to stand up more and more environments both on prem and in the cloud.

Fig 4. The whole deployment pipeline

Room for improvement

There is plenty of room for improvement in all of this though

* Config checked into source control and built into the artifact
Checking the config into the code base is great for our current team, we all know where the config is, its easy to change or add new things to it. But for a larger team or where we didn't want the entire team to know secret connection string to live DBs it wouldn't work. Thank goodness we don't have any paranoid DBAs here. Also there is a problem if we want to tweak some config in an environment. we need to produce an entire new build artifact from source code, which might now have other changes in it that we don't want to go live. We can handle this using feature toggles and a branch by abstraction mode of working but it requires good discipline which we as a team are only just getting our heads around. Basically if the code is always in a releasable state this is not an issue.

* Staging and live both have the same config
When you do blue green deployments as we are doing, both staging and live always point to the live resources and databases, so it's hard to test that the new UI in staging works with the new API, also in staging as both the staging and current live UI will be pointing to the live API. Likewise the live and staging API will both be pointing to the live DB or other resources. Blue green deployments are not designed for integration testing like this, that's what the lower environments are for.
On a very similar vein, logging will go to the same log files which can be a problem if your logging framework takes out locks on files, we use log4net a lot which does. There are options to work in a lock when required mode with log4net but it can really hit performance. We have solved this by rewriting the path to the log file on blue green switch.

* No blue green style deployments of windows services
The lack of blue green deployment of services means that we have a longer period of disruption when deploying and a slower rollback strategy. Added to this you can't test the service on the production server before you actually put it live. There are options here but it gets quite complicated to do, and by the time the service is going live you should have finished all your testing by now.

* Database upgrades are not part of deployment
At the time of writing we are still doing database deployments by hand, this is slowly changing and some of our DBs do now have automated deployments, mainly using the redgate SQL tool set, but we are still getting better at this. It's my hope that we will get to the fully automated deployments of data schemas at some point, but we are still concentrating on the deployment of the code base

* Snowflake servers
All our servers both on prem and in the cloud are built, installed and configured manually. I've started to use chocolaty and powershell to automate what I can around set-up and configuration, but the fact still remains that its a manual process to get a new server up and running. The consequence of this is that each server has small differences to other servers that "should" be the same. This means that we could introduce bugs in different environments due to accidental differences in the server itself.

* Ability to spin up environments set up as needed for further growth 
Related to the above point, as a way to move away from the problem of snowflake servers we need to look at technologies like puppet, chef, Desired state configuration etc. If we had this automation we could spin up test servers, deploy to other regions/markets, or scale up the architecture by creating more machines. 

Relevant Technology Stack (for this article)

• Windows
• Powershell
• IIS
• SVN and Git
• Msbuild and gulp

Next >>

Ive written a follow up article to this which details the nuts and bolts of the blue green deployment techniques we are currently using. blue-green-web-deployment-with-IIS-and-powershell.
The code for which can be found on my git hub here: https://github.com/DamianStanger/Powershell/

Sunday, 31 August 2014

Using Powershell to create local users on windows

We are setting up a server farm for a new environment consisting on many servers and we want to create many users with admin rights on each one, including the remote desktop user group.

We could have spent an hour or so and used the GUI on each server but we thought that a script would be quicker, not to mention more fun to write.

The latest version is here: https://github.com/DamianStanger/Powershell/blob/master/Add-LocalAdminUserAccount

The version at time of writing is below:

Function Add-LocalUserAdminAccount{
  param (
  [parameter(Mandatory=$true)]
    [string[]]$ComputerNames=$env:computername,
  [parameter(Mandatory=$true)]
    [string[]]$UserNames,
  [parameter(Mandatory=$true)]
    [string]$Password
  )

  foreach ($computer in $ComputerNames){
    foreach ($userName in $UserNames){
      Write-Host "setting up user $userName on $computer"

      [ADSI]$server="WinNT://$computer"
      $user=$server.Create("User",$userName)
      $user.SetPassword($Password)
      $user.Put("FullName","$userName-admin")
      $user.Put("Description","Scripted admin user for $userName")

      #PasswordNeverExpires
      $flag=$User.UserFlags.value -bor 0x10000
      $user.put("userflags",$flag)

      $user.SetInfo()

      [ADSI]$group = “WinNT://$computer/Administrators,group”
      write-host "Adding" $user.path "to " $group.path
      $group.add($user.path)

      [ADSI]$group = “WinNT://$computer/Remote Desktop Users,group”
      write-host "Adding" $user.path "to " $group.path
      $group.add($user.path)
    }
  }
}

[string[]]$computerNames = "computer1", "computer2"
[string[]]$accountNames = "ops", "buildagent"

Add-LocalUserAccount -ComputerNames $computerNames -UserNames $accountNames -Password mysecurepassword


The lines that do the damage are 14 to 24 to create and save the user, then 26 to 32 to add the user to the required groups on the machine.

It would be trivial to change this script so it was a powershell module but the script as it stands serves my current needs. Just add more computer names and account names to suit your needs we have around 10 of each in the version of the scripts I'm running.